---
title: "Step 4.1: How to Establish an FTP Data Connection to Proqio"
description: Guide to esablishing an FTP data connection to Proqio
---
[Skip to content](https://help.proqio.com/step-4.1-how-to-establish-an-ftp-data-connection-to-proqio#main-content)
[](https://help.proqio.com/?hsLang=en)
Open main navigation
Close main navigation
How can we help you?
- There are no suggestions because the search field is empty.
1. [Knowledge base](https://help.proqio.com/?hsLang=en)
2. [Getting started](https://help.proqio.com/getting-started?hsLang=en)
3. [Configure Your Instruments](https://help.proqio.com/getting-started?hsLang=en#configure-your-instruments)
# Step 4.1: How to Establish an FTP Data Connection to Proqio
## Follow these steps to successfully transmit data from your gateway to the Proqio platform.
### **Step 1: Create or Request FTP Credentials from Proqio**
You have two options for setting up FTP credentials:
#### **Option A: Self-Generate FTP Credentials in Proqio**
If you have admin access to the **Monitoring** section in Proqio, you can create FTP credentials yourself:
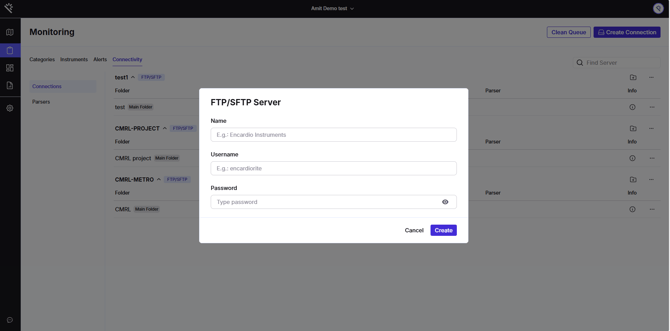
1. In the **Monitoring** section, click on **Create a Connection** and select **FTP Server**.

2. Enter a **name**, choose a **username**, and set a **password** for the FTP connection.
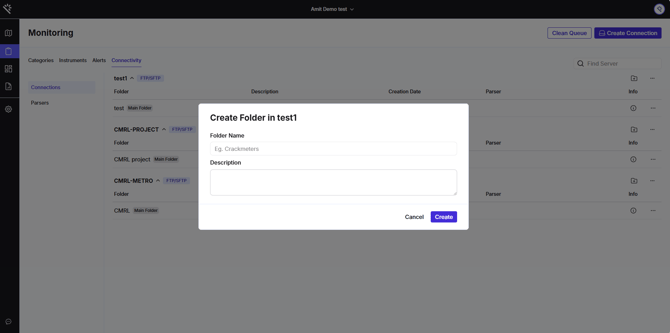
3. Click **Create a Folder** and give it a name.
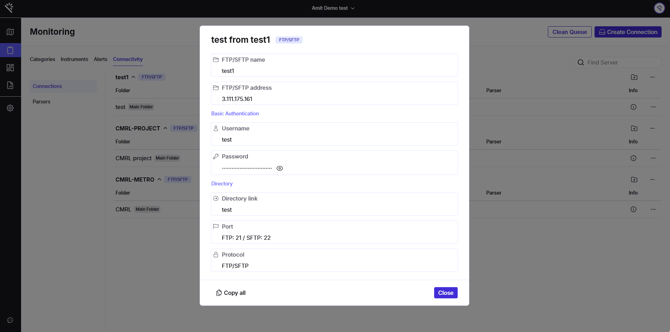
4. After the folder is created, click the **“info” icon** to the right of the folder name. This will display your FTP credentials (host, username, password, and folder path).
**Additional Notes:**
- If your datalogger or gateway supports sending data to specific directories, you can create **multiple folders** under the same FTP connection to add different categories of instruments.
- If connecting via **FTP**, you must use **port 21**
- If connecting via **SFTP**, you must use **port 22**
#### **Option B: Request FTP Credentials from Proqio Support**
If you are a new user or having any issues generating the FTP connection and credentials, you can contact Proqio Support to request FTP credentials. The team will create the connection for you and securely share the access details, as well provide further further clarification on how to create the FTP connection and generate credentials yourself.
---
### **Step 2: Configure Your Gateway**
Set up your data logger or gateway to transmit data to the FTP server using the credentials provided by Proqio.
Ensure the gateway is configured to:
- **FTP**
****
### IMPORTANT NOTE
### How Proqio’s FTP Works
Proqio’s FTP service is designed **only for data ingestion**, not for file storage or synchronization. Below is how it works and the key principles to follow:
#### FTP Processing Flow
- The FTP **waits for incoming data files**.
- As soon as a file is received, it is **automatically processed if the folder has a parser assigned.**
If the folder does not have a parser assigned, the file will be kept in the root folder until a manual reupload is done for that file.
- After processing, the file is **moved to another folder** to indicate:
- Successful processing, or
- Failed processing
#### ⚠️ Important Behavior to Understand
- **Files cannot be edited once uploaded**.
- Each upload must be **atomic**, meaning:
- It should contain **only new data**.
- Proqio **does not store or manage files** — it only receives and processes data.
#### Reappearing or Duplicate Data
- If deleted readings appear again, it means they have been **re-uploaded from an external source**.
- If **historical data is resent**, it will be **processed again**, causing:
- Readings for the same timestamp to be overwritten, or
- Previously deleted data to reappear
#### Best Practices
- Ensure your system **only sends new readings**.
- Do **not resend historical files**.
- Do **not use the FTP for file synchronization or storage**.
- The sending system should simply **upload new data files and nothing else**.
---
### **Step 3: Verify Data is Reaching the FTP Server**
Use [FileZilla](https://filezilla-project.org/) or any FTP client software to confirm that your data is being correctly uploaded:
1. Download and install FileZilla.
2. Open FileZilla and enter your FTP credentials:
- URL
- Port
- Username
- Password
3. Connect and check if your data files are visible in the FTP directory.
The recommended configuration for pushing data via FTP from your gateway is

---
### **Step 4: Notify Proqio Support**
Once you’ve verified that correct data is being successfully transmitted, inform Proqio support. They will proceed with the next step.
---
### **Step 5: Provide instrument details**
In order to add the instruments on PROQIO we requireinstrument details like**:**
- **Instrument ID:** To be displayed for each sensor. This can be changed after adding the instrument.
- **Original ID:** Instrument ID in the source file, this is very critical, as the parser will identify each instrument based on this ID. The original ID cannot be changed after adding a instrument.
- **Installation Date**
- **Longitude(X), Latitude(Y), Level(Z):** This can be changed after adding the instrument to place instrument at the correct location on the map.
- **Calibration**
- **Threshold Values**
---
### **Step 6: Provide a Sample File for Parser Setup**
Proqio will now create a **data parser** to read and process your files.
To do this, they need a **sample data file**, which you can:
- Send directly to the support team, **or**
- Confirm that it’s available in the FTP so they can retrieve it themselves
Once the parser is set up and tested, your data will begin flowing into the Proqio platform.
- [Getting started](https://help.proqio.com/getting-started?hsLang=en#main-content)
- [Project details](https://help.proqio.com/getting-started?hsLang=en#project-details)
- [Teams and members](https://help.proqio.com/getting-started?hsLang=en#teams-and-members)
- [Account](https://help.proqio.com/getting-started?hsLang=en#account)
- [Configure Your Instruments](https://help.proqio.com/getting-started?hsLang=en#configure-your-instruments)
- [Notifications](https://help.proqio.com/getting-started?hsLang=en#notifications)
- [Connectivity methods](https://help.proqio.com/getting-started?hsLang=en#connectivity-methods)
- [Alerts](https://help.proqio.com/getting-started?hsLang=en#alerts)
- [Map](https://help.proqio.com/map?hsLang=en#main-content)
- [Tools](https://help.proqio.com/map?hsLang=en#tools)
- [Analysis](https://help.proqio.com/map?hsLang=en#analysis)
- [Monitoring](https://help.proqio.com/monitoring?hsLang=en#main-content)
- [Instruments](https://help.proqio.com/monitoring?hsLang=en#instruments)
- [Dashboard Creation & Configuration](https://help.proqio.com/dashboard-creation-configuration?hsLang=en)
- [Report Creation](https://help.proqio.com/report-creation?hsLang=en)
- [New Feature Releases](https://help.proqio.com/new-feature-releases?hsLang=en)
- [Project Hierarchy](https://help.proqio.com/project-hierarchy?hsLang=en)
- [Analyse and Interpret your Data](https://help.proqio.com/analyse-and-interpret-your-data?hsLang=en)
- [Learn How to Navigate Proqio](https://help.proqio.com/learn-how-to-navigate-proqio?hsLang=en)
- [Configure Your Map View](https://help.proqio.com/configure-your-map-view?hsLang=en)
- [How to Add a Real Time Picture on Map](https://help.proqio.com/how-to-add-a-real-time-picture-on-map?hsLang=en)
- [Managing Your Data](https://help.proqio.com/managing-your-data?hsLang=en)
- [Uploading Records Manually](https://help.proqio.com/uploading-records-manually?hsLang=en#main-content)
- [Steps for uploading instrument data records manually](https://help.proqio.com/uploading-records-manually?hsLang=en#steps-for-uploading-instrument-data-records-manually)
- [ADA](https://help.proqio.com/ada?hsLang=en)
- [Digital Twin](https://help.proqio.com/digital-twin?hsLang=en)
- [Lines and Textures](https://help.proqio.com/lines-and-textures?hsLang=en)
[](http://www.proqio.com?hsLang=en)
Copyright © 2026, Proqio